SAP BTP Destination 설정 체크리스트 — 연결 안 될 때 이것만 확인하세요
SAP BTP Destination 설정 체크리스트 — 연결 안 될 때 이것만 확인하세요
SAP BTP Destination 설정 체크리스트 -- 연결 안 될 때 이것만 확인하세요
1. SAP BTP Destination이란?
Q. Destination이 정확히 무엇이고, 왜 필요한가요?
SAP BTP Destination은 BTP 애플리케이션이 외부 시스템(SAP S/4HANA, SAP SuccessFactors, 3rd-party API 등)에 연결할 때 사용하는 연결 구성 정보 저장소입니다. URL, 인증 정보, 프록시 설정 등을 한곳에서 관리하여, 애플리케이션 코드에 하드코딩하지 않고도 안전하게 외부 시스템과 통신할 수 있게 해 줍니다.
Destination의 핵심 역할:
- 연결 추상화 -- 애플리케이션 코드에서 URL, 인증 정보를 분리하여 운영 환경별로 유연하게 전환
- 인증 관리 -- Basic Auth, OAuth 2.0, Client Certificate, SAML Bearer 등 다양한 인증 방식을 선언적으로 설정
- On-Premise 연결 -- Cloud Connector를 통해 사내 시스템에 안전한 터널링 제공
- Principal Propagation -- 로그인한 사용자의 ID를 백엔드 시스템까지 전달
지원 프로토콜:
| 프로토콜 | 용도 | 비고 |
|---|---|---|
| HTTP | REST API, OData 서비스 호출 | 가장 일반적 |
| RFC | SAP ABAP 시스템의 RFC 함수 모듈 호출 | Cloud Connector 필요 |
| LDAP | 디렉토리 서비스 조회 | 제한적 사용 |
| SMTP 메일 발송 | 메일 서비스 연동 |
Destination은 Subaccount 레벨 또는 Service Instance 레벨에서 관리할 수 있으며, 일반적으로 Subaccount 레벨 설정이 권장됩니다.
2. Destination 생성 기초 체크리스트
Q. Destination을 생성할 때 반드시 확인해야 할 필수 항목은 무엇인가요?
BTP Cockpit에서 Destination을 생성할 때, 다음 필수 필드를 빠짐없이 설정해야 합니다. 하나라도 누락되면 연결 실패의 원인이 됩니다.
필수 항목 체크리스트:
- Name -- 애플리케이션에서 참조할 고유 이름. 공백과 특수문자를 피하고, 대소문자를 정확히 맞춰야 합니다.
- Type --
HTTP또는RFC. 대부분 HTTP를 사용합니다. - URL -- 대상 시스템의 엔드포인트 URL. 프로토콜(
https://)부터 정확히 입력합니다. - ProxyType --
Internet(클라우드 시스템) 또는OnPremise(사내 시스템). Cloud Connector 사용 시 반드시OnPremise로 지정합니다. - Authentication -- 인증 방식 선택. 다음 섹션에서 각 타입별로 상세히 다룹니다.
기본 Destination 설정 JSON (OAuth2ClientCredentials 예시):
{
  "Name": "S4HANA_Cloud_API",
  "Type": "HTTP",
  "URL": "https://my-s4hana.s4hana.ondemand.com",
  "ProxyType": "Internet",
  "Authentication": "OAuth2ClientCredentials",
  "tokenServiceURL": "https://my-s4hana.authentication.eu10.hana.ondemand.com/oauth/token",
  "clientId": "sb-xxxxxx-xxxx-xxxx-xxxx-xxxxxxxxxxxx!b12345",
  "clientSecret": "AbCdEfGhIjKlMnOpQrStUvWxYz0123456789=",
  "tokenServiceURLType": "Dedicated",
  "HTML5.DynamicDestination": "true",
  "WebIDEEnabled": "true",
  "WebIDEUsage": "odata_gen"
}
Additional Properties 중 자주 사용하는 항목:
HTML5.DynamicDestination: true-- App Router에서 동적으로 Destination을 사용할 때 필수sap-client-- SAP 시스템의 클라이언트 번호 (예:100)WebIDEEnabled: true-- SAP Business Application Studio에서 Destination을 활용할 때 설정URL.headers.X-Custom-Header-- 요청 시 자동으로 추가할 커스텀 헤더
3. 인증 타입별 설정 가이드
Q. 인증 타입이 여러 개인데, 내 시나리오에는 어떤 것을 써야 하나요?
인증 타입 선택은 연결 대상 시스템이 요구하는 방식에 따라 결정됩니다. 아래에 가장 많이 사용되는 4가지 타입을 정리했습니다.
3-1. NoAuthentication
인증이 불필요한 공개 API에 사용합니다. 테스트 환경에서 빠르게 연결을 확인할 때 유용하지만, 프로덕션에서는 보안상 권장되지 않습니다.
3-2. BasicAuthentication
사용자 ID와 비밀번호를 Base64로 인코딩하여 전송합니다. SAP On-Premise 시스템(ECC, S/4HANA On-Premise)에서 일반적으로 사용됩니다.
- 필수 필드:
User,Password - 주의: 비밀번호 만료 시 Destination 연결이 끊어지므로, 서비스 계정(Technical User)을 사용하는 것이 권장됩니다.
3-3. OAuth2ClientCredentials
서버 대 서버(M2M) 통신에 적합합니다. 사용자 컨텍스트 없이 Client ID/Secret으로 액세스 토큰을 발급받습니다. SAP S/4HANA Cloud, SAP SuccessFactors API 연동에 주로 사용됩니다.
- 필수 필드:
clientId,clientSecret,tokenServiceURL - 주의:
tokenServiceURLType을Dedicated또는Common으로 정확히 지정해야 합니다.
3-4. OAuth2SAMLBearerAssertion
로그인한 사용자의 ID를 백엔드까지 전파(Principal Propagation)할 때 사용합니다. SSO 시나리오에서 필수적이며, 설정이 가장 복잡합니다.
- 필수 필드:
audience,authnContextClassRef,clientKey,tokenServiceURL,tokenServiceUser,tokenServicePassword - 주의: Trust 설정(IAS/IDP와 백엔드 시스템 간)이 사전에 완료되어야 합니다.
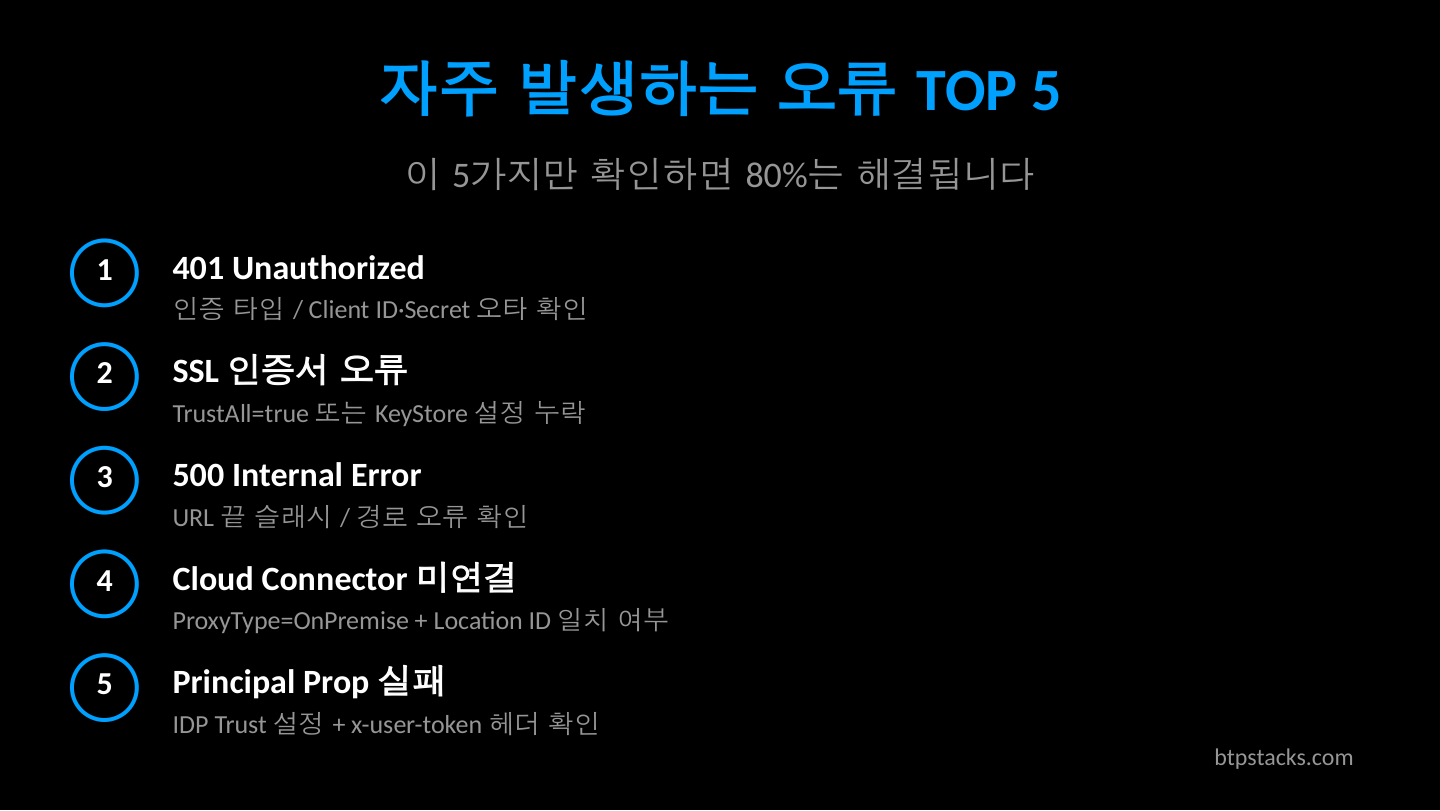
4. 자주 발생하는 오류 TOP 5
Q. Destination 연결이 실패할 때 가장 흔한 원인은 무엇인가요?
오류 1: 401 Unauthorized
증상: "Authentication failed" 또는 "401" 응답
- Basic Auth의 경우 비밀번호 만료 또는 계정 잠금 여부 확인
- OAuth의 경우
tokenServiceURL이 정확한지 확인 -- 끝에/oauth/token경로가 빠져 있는 경우가 많음 clientId와clientSecret값에 불필요한 공백이 포함되지 않았는지 확인
오류 2: SSL Handshake 실패
증상: "PKIX path building failed" 또는 "SSL certificate problem"
- 대상 시스템의 SSL 인증서가 자체 서명(self-signed)인 경우, BTP Cockpit의 Trust Configuration에 해당 인증서를 업로드해야 합니다
- 인증서 체인(Root CA - Intermediate CA - Server)이 완전한지 확인
오류 3: 500 Internal Server Error
증상: Destination 자체는 설정되었으나 호출 시 500 에러
- 대상 시스템의 서비스가 정상 동작 중인지 직접 확인
- URL 경로가 정확한지, 특히 OData 서비스 경로에 오타가 없는지 점검
- Additional Properties의 헤더 설정이 백엔드와 충돌하지 않는지 확인
오류 4: Cloud Connector 미연결
증상: "Backend service did not respond" 또는 연결 타임아웃
- Cloud Connector가 실행 중이고 BTP Subaccount에 정상 연결되었는지 Cloud Connector Admin UI에서 확인
ProxyType이OnPremise로 설정되었는지 확인- Cloud Connector의 Access Control에 해당 Virtual Host와 URL 경로가 등록되었는지 확인
오류 5: Principal Propagation 실패
증상: "SAML assertion validation failed" 또는 사용자 매핑 오류
- BTP Subaccount의 Trust Configuration에서 IDP 설정이 올바른지 확인
- 백엔드 시스템에서 SAML Trust가 구성되어 있는지 확인
nameIdFormat과 사용자 매핑 속성(emailvsloginName)이 일치하는지 확인
5. On-Premise 연결 시 체크리스트
Q. Cloud Connector를 통해 On-Premise 시스템에 연결하려면 무엇을 설정해야 하나요?
On-Premise 시스템 연결은 Cloud Connector라는 경량 에이전트를 통해 이루어집니다. 인터넷에서 직접 접근할 수 없는 사내 시스템과 BTP를 안전하게 연결하는 역할을 합니다.
단계별 체크리스트:
- Cloud Connector 설치 및 Subaccount 연결
- Cloud Connector를 사내 네트워크에 설치하고, BTP Subaccount의 Region과 Subaccount ID로 연결
- 연결 상태가 "Connected"인지 Cloud Connector Admin UI(
https://localhost:8443)에서 확인
- Access Control 설정
- Cloud Connector에서 Cloud To On-Premise 메뉴에서 Virtual Host와 Internal Host를 매핑
- URL 경로를
/또는 특정 서비스 경로로 제한하여 보안 범위를 최소화
- Destination 설정
ProxyType을 반드시OnPremise로 설정- URL에 Cloud Connector에서 지정한 Virtual Host:Port를 입력 (Internal Host가 아님)
- 여러 Cloud Connector를 사용하는 경우
CloudConnectorLocationIdAdditional Property를 설정
{
  "Name": "OnPremise_ERP",
  "Type": "HTTP",
  "URL": "http://virtual-erp:443/sap/opu/odata/sap/API_BUSINESS_PARTNER",
  "ProxyType": "OnPremise",
  "Authentication": "PrincipalPropagation",
  "sap-client": "100",
  "CloudConnectorLocationId": "DC1"
}
Location ID는 동일 Subaccount에 여러 Cloud Connector가 연결된 경우에만 필요합니다. 단일 Cloud Connector 환경에서는 생략해도 됩니다.
6. CAP/Node.js에서 Destination 사용하는 방법
Q. CAP 프로젝트에서 Destination을 어떻게 코드로 사용하나요?
SAP Cloud Application Programming Model(CAP)에서는 @sap-cloud-sdk/connectivity 패키지 또는 CDS의 Remote Service 기능을 통해 Destination에 접근할 수 있습니다.
방법 1: CDS Remote Service (권장)
package.json에서 외부 서비스를 Destination과 바인딩합니다.
{
  "cds": {
    "requires": {
      "API_BUSINESS_PARTNER": {
        "kind": "odata-v2",
        "model": "srv/external/API_BUSINESS_PARTNER",
        "[production]": {
          "credentials": {
            "destination": "S4HANA_Cloud_API",
            "path": "/sap/opu/odata/sap/API_BUSINESS_PARTNER"
          }
        }
      }
    }
  }
}
서비스 핸들러에서는 다음과 같이 호출합니다.
const cds = require('@sap/cds');

module.exports = class BusinessPartnerService extends cds.ApplicationService {
  async init() {
    const S4 = await cds.connect.to('API_BUSINESS_PARTNER');

    this.on('READ', 'BusinessPartners', async (req) => {
      try {
        const result = await S4.run(
          SELECT.from('A_BusinessPartner')
            .columns('BusinessPartner', 'BusinessPartnerFullName')
            .limit(100)
        );
        return result;
      } catch (err) {
        // Destination 연결 실패 시 상세 로깅
        console.error('[Destination Error]', {
          destination: 'S4HANA_Cloud_API',
          status: err.status,
          message: err.message,
          innererror: err.innererror || 'N/A'
        });
        req.error(502, 'External system is not reachable. Check Destination configuration.');
      }
    });

    await super.init();
  }
};
방법 2: SAP Cloud SDK 직접 사용
CDS 프레임워크 외부에서 직접 Destination을 조회하고 HTTP 요청을 보낼 때 사용합니다.
const { executeHttpRequest, getDestination } = require('@sap-cloud-sdk/http-client');
const { retrieveJwt } = require('@sap-cloud-sdk/connectivity');

async function fetchBusinessPartners(req) {
  try {
    const jwt = retrieveJwt(req);
    const response = await executeHttpRequest(
      { destinationName: 'S4HANA_Cloud_API', jwt },
      {
        method: 'get',
        url: '/sap/opu/odata/sap/API_BUSINESS_PARTNER/A_BusinessPartner',
        params: { '$top': 10, '$format': 'json' }
      }
    );
    return response.data.d.results;
  } catch (error) {
    console.error('Destination fetch failed:', error.message);
    if (error.cause) {
      console.error('Root cause:', error.cause.message);
    }
    throw error;
  }
}

module.exports = { fetchBusinessPartners };
필수 서비스 바인딩: Cloud Foundry 환경에서 Destination을 사용하려면 destination 서비스 인스턴스와 connectivity 서비스 인스턴스(On-Premise 연결 시)를 애플리케이션에 바인딩해야 합니다.
# mta.yaml 발췌
resources:
  - name: my-destination-service
    type: org.cloudfoundry.managed-service
    parameters:
      service: destination
      service-plan: lite

  - name: my-connectivity-service
    type: org.cloudfoundry.managed-service
    parameters:
      service: connectivity
      service-plan: lite

modules:
  - name: my-srv
    type: nodejs
    requires:
      - name: my-destination-service
      - name: my-connectivity-service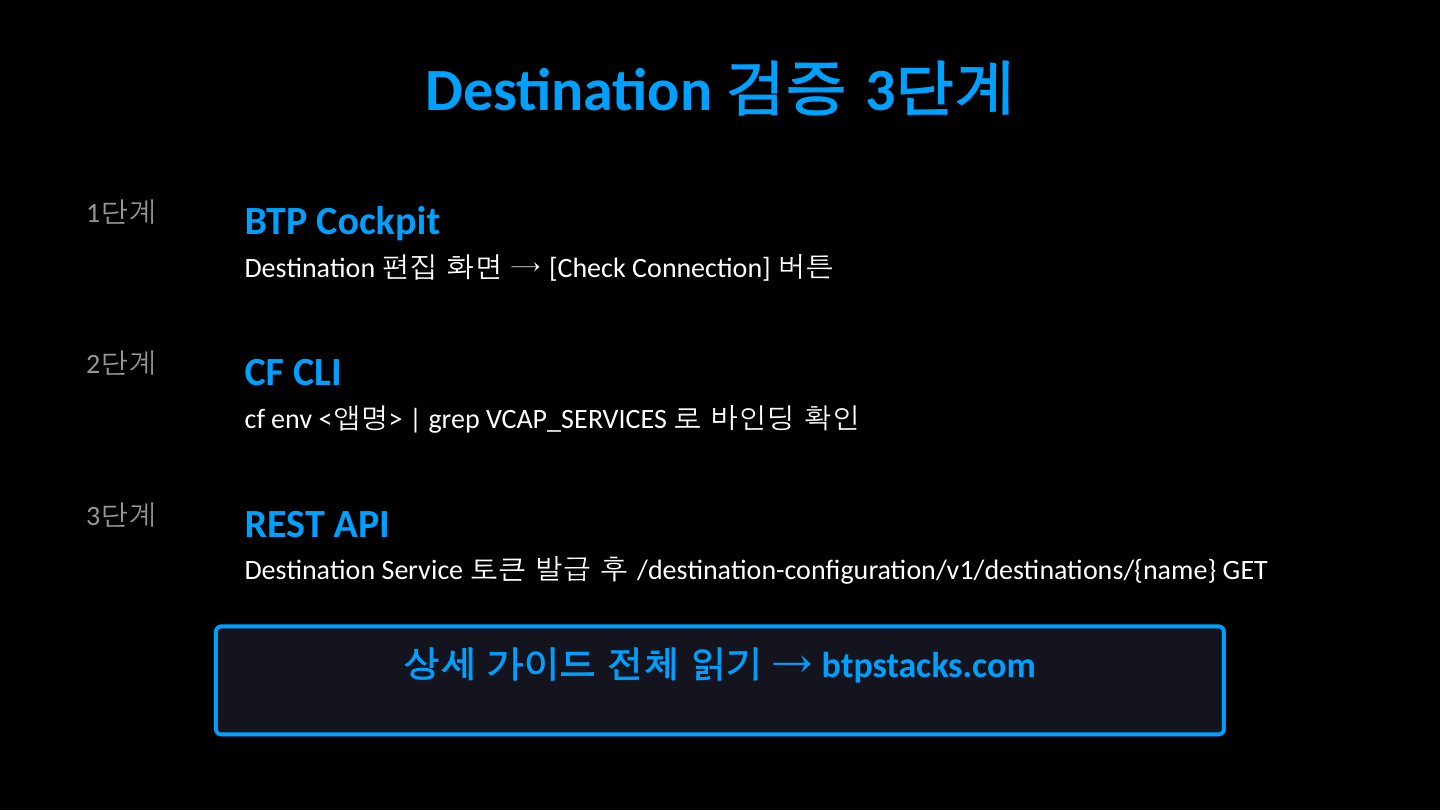
7. Destination 검증 방법
Q. Destination 설정이 올바른지 어떻게 검증할 수 있나요?
7-1. BTP Cockpit의 "Check Connection" 버튼
가장 간단한 방법입니다. BTP Cockpit에서 해당 Destination을 열고 "Check Connection" 버튼을 클릭하면, 기본적인 연결 테스트를 수행합니다. 단, 이 테스트는 URL 도달 여부만 확인하며 인증 흐름 전체를 검증하지는 않을 수 있습니다.
7-2. CF CLI를 통한 확인
## Destination 서비스 인스턴스 확인
cf services | grep destination

## 서비스 키 생성 (이미 있으면 생략)
cf create-service-key my-destination-service my-dest-key

## 서비스 키 조회 -- 인증 정보 확인
cf service-key my-destination-service my-dest-key

## 앱 환경변수에서 바인딩된 Destination 정보 확인
cf env my-app | grep -A 20 destination
7-3. Destination Service REST API 직접 호출
프로그래밍 방식으로 Destination 정보를 조회하고 검증할 수 있습니다. 먼저 Destination Service의 OAuth 토큰을 발급받아야 합니다.
// Destination Service REST API로 Destination 정보 조회
const axios = require('axios');

async function verifyDestination(destServiceCreds, destinationName) {
  // 1단계: OAuth 토큰 발급
  const tokenResponse = await axios.post(
    `${destServiceCreds.url}/oauth/token`,
    'grant_type=client_credentials',
    {
      auth: {
        username: destServiceCreds.clientid,
        password: destServiceCreds.clientsecret
      },
      headers: { 'Content-Type': 'application/x-www-form-urlencoded' }
    }
  );

  const accessToken = tokenResponse.data.access_token;

  // 2단계: Destination 조회
  const destResponse = await axios.get(
    `${destServiceCreds.uri}/destination-configuration/v1/destinations/${destinationName}`,
    {
      headers: { 'Authorization': `Bearer ${accessToken}` }
    }
  );

  console.log('Destination Config:', destResponse.data.destinationConfiguration);
  console.log('Auth Tokens:', destResponse.data.authTokens);

  // authTokens[0].error가 있으면 인증 실패
  const authToken = destResponse.data.authTokens?.[0];
  if (authToken?.error) {
    console.error('Authentication Error:', authToken.error);
    return false;
  }

  console.log('Destination verification successful.');
  return true;
}
핵심 팁:
authTokens배열의 첫 번째 요소에error필드가 있으면 인증 설정에 문제가 있다는 뜻입니다. 이 에러 메시지가 가장 정확한 디버깅 단서를 제공합니다.
8. 실전 QnA 모음
실제 SAP BTP 개발 현장에서 자주 등장하는 질문 5가지를 정리했습니다.
Q1. Destination 이름은 대소문자를 구분하나요?
A. 네, 구분합니다. MyDest와 mydest는 서로 다른 Destination으로 취급됩니다. 코드에서 참조할 때 BTP Cockpit에 등록된 이름과 정확히 동일한 대소문자를 사용해야 합니다. 관례적으로 대문자와 언더스코어 조합(예: S4HANA_CLOUD_API)을 사용하는 팀이 많습니다.
Q2. 로컬 개발 환경에서 Destination을 어떻게 테스트하나요?
A. default-env.json 파일을 프로젝트 루트에 생성하여 로컬에서 Destination 정보를 시뮬레이션할 수 있습니다. 또는 cf ssh를 통한 포트 포워딩으로 Cloud Foundry의 Destination Service에 직접 접근하는 방법도 있습니다. CAP 프로젝트에서는 .cdsrc-private.json에 로컬용 credentials를 별도 지정하는 것이 권장됩니다.
{
  "requires": {
    "API_BUSINESS_PARTNER": {
      "credentials": {
        "url": "http://localhost:3001/v2/odata"
      }
    }
  }
}
Q3. 하나의 Destination으로 여러 OData 서비스를 호출할 수 있나요?
A. 네, 가능합니다. Destination URL을 시스템의 루트(예: https://my-s4.ondemand.com)로 설정하고, 개별 서비스 경로는 코드에서 path 파라미터로 지정하면 됩니다. 이렇게 하면 하나의 Destination으로 동일 시스템의 여러 서비스를 호출할 수 있어 관리가 간편해집니다.
Q4. Destination의 OAuth 토큰이 만료되면 자동 갱신되나요?
A. SAP BTP의 Destination Service는 토큰 캐싱과 자동 갱신을 처리합니다. 토큰이 만료되면 다음 요청 시 자동으로 새 토큰을 발급받습니다. 다만, clientSecret이 변경되었거나 Token Service URL이 바뀐 경우에는 Destination 설정을 수동으로 업데이트해야 합니다.
Q5. "Destination not found" 오류가 발생합니다. 분명히 생성했는데 왜 안 보이나요?
A. 다음 항목을 순서대로 확인하세요.
- 서비스 바인딩 확인 -- 앱에
destination서비스 인스턴스가 바인딩되어 있는지cf env [앱이름]으로 확인 - Destination 범위 확인 -- Subaccount 레벨에서 생성했는지, 다른 Subaccount에 생성하지 않았는지 확인
- 이름 철자 확인 -- 코드의 Destination 이름과 Cockpit의 이름이 완전히 일치하는지 확인 (대소문자 포함)
- Service Instance 레벨 Destination -- Service Instance 레벨에서 생성한 경우, 해당 인스턴스가 앱에 바인딩되어 있어야 합니다
더 읽어볼 자료
- SAP Help - Create HTTP Destinations
- SAP Help - Consuming the Destination Service
- SAP Help - Cloud Connector
- SAP Help - OAuth SAML Bearer Assertion Authentication
- SAP Developers - Add External Service to CAP Application
- SAP Developers - Create a Destination in SAP BTP
- SAP Cloud SDK - Destination Documentation
SAP BTP 버전 참고: 본 가이드는 SAP BTP Cloud Foundry 환경(2026년 4월 기준)을 기준으로 작성되었습니다. Kyma/Kubernetes 환경에서는 Destination 사용 방식이 일부 다를 수 있으므로 별도 문서를 참고하시기 바랍니다.
⚠️ 비공식 콘텐츠 안내
본 게시글은 btpstacks.com의 독립 학습 콘텐츠이며 SAP SE와 무관합니다. 공식 문서는 help.sap.com을 참고하세요.
SAP, ABAP, SAP BTP, SAPUI5, SAP Fiori는 독일 및 기타 국가에서 SAP SE의 상표 또는 등록상표입니다.
댓글 0
아직 댓글이 없습니다.